George Washington said, "Experience enables you to have good judgment. Experience comes from making bad judgment." Such is the case with my paint job. Lots of effort and expense, only to strip it off. I started noticing a problem when I mounted the shock. By the time I got to the steering, it was really getting bad. It turns out that the base coat of galvanizing compound is very weak. Little specs are flaking off, taking the top coat with it. So, I have the opinion that it was better to deal with it when I can get to the entire frame rather than taking it apart later.
So I made another trip to the hardware store to say goodbye to around $100. This is for two cans of stripper compound, scraper, metal brushes (large and small) and disposable respirator. In addition, I bought more primer and paint for a second try. All this, with drying time, took two days to strip and another two days for drying time (although paining itself only took 15min per coat).
Hopefully, you won't need to take paint off metal. However, if you do, using paint stripper gives good results. Paint stripping compound is amazing stuff - but very dangerous! Within a few minutes of spraying it on, I found the paint and undercoat turned into a goo that could be scraped off after a few passes. Just don't scrimp on the safety gear! Wear safety glasses, mask and spend a few bucks to get the special stripping gloves (rubber dish washing gloves are NOT good enough). I would also recommend wearing nitrol gloves underneath these too. Why? Just one tiny splash of that stuff burns! I found when I splashed just a tiny particle of the stuff on my arm, I had to wash it off quickly due to the pain. Fortunately, I had a working garden hose handy to flush off the occasional drop that would land on me - and I used it several times!
So far, doing the paint job again has cost around $100 in chemicals and disposable tools plus
1 hour shopping
3 hours stripping rear assembly. 7 hours stripping main frame. Prime and paint take 15 minutes per coat - but drying time is over 6 hours. So, that's a minimum of two evenings and mornings.
After repainting the bug, I found that the paint looks about the same but it's much more durable. I do wonder if undercoat material would do even better. Ah well, perfection is the enemy of progress.
Thursday, July 24, 2008
Monday, July 21, 2008
Time out for better inventory control.
I know I'm obsessing about parts, but I want to track them better. So, I now I am using parts drawers and a labeler to go along with the database. Now every time I check a small part, it goes into it's own clear plastic drawer with a label. Large parts still go in the big toolbox. I've found that checking in parts slows things down, especially since I need to make the database agree with the receipt from the store (which isn't always clear) and finally the label on the drawer. However, it hopefully will save quite a bit of time later when I can just grab a part rather than make a special trip to the store just for being one part short.
This system also provides a method of keeping track of substitutions where used and difficulties getting parts (eg, Perhaps a store carries it, but they are out of stock and a substitute may be available from an alternate supplier). Many of the substitutions are for more robust versions of a part (eg using #12 instead of #16 wire). Others may have bigger consequences (eg. The somewhat experimental galvanizing treatment I'm using). For each part, the database notes where it was used, how many ordered, unit cost, unit packaging (eg. 6pack, box of 20), sales tax, shipping paid, steps the material or tool is used in and if it's a substitute from the original specification. Later, I'll be editing the database as I find a trade off between the expense of collecting info for each field and the cost or time saved by having it.
Entering the remaining small parts plus labeling took about 16 hours (over two full days) to represent them correctly in the database as well as being categorized so I can pull them quickly. Blogging took about 2 hours. Naturally, when I get faster at knowing what parts look like, this time will go down. I'm sure at the end of the project, I'll find some efficiencies. Time will tell if these efficiencies are worth the effort to get them. (it may not be - in the case of small nuts, it's less expensive to just buy a quantity that is known to be more than enough) I might be short a bolt or two but it looks like most pieces and tools except for the Optima Blue Top batteries are now on site!
Further parts should come to about $500. I think a blanket $500 statement should be more than enough to account for materials I may have forgotten and parts I may already have in my shop - which I'm also tracking.
Tuesday, July 15, 2008
Tracking resources used.
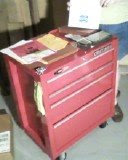 One of the most important items in my shop is a new roll away tool chest that acts as a mini office. It is used to store all the parts, paperwork and revised instructions having to do with the bug. Every screw, nut, material and accessory is checked in as if it was being stored in the cart. Should I decide to build another BugE after this one, the second one assembled would go quite a bit quicker since I'll have records to allow me to easily combine orders and compare supplier pricing!
I'm also revising the manual to be more complete and that takes quite a bit of time and effort to do right.
If you are going for a tool chest, don't bother with the cheap ones at Lowes. Get at least a Craftsman tool chest. If you get one, spend a bit more for ball bearing or "quiet glide" drawers. The price may be only be slightly more if you catch a sale (and there's always some sort of sale at Sears). In my opinion, not hearing the cheap drawer slider noise and the convenience of the rear lock bar is worth the extra bucks. Plus, they seem to be made better and have large casters that can go over most anything.
Currently, my system is to take a guess on the materials needed for each step. (parts are listed, but there is always SOMETHING missing, even if it's something like a paintbrush). Then, I keep all receipts and using a custom MS-Access database, I check items into the figurative tool box. Then, when I have enough materials for a step, I'll try to do it. Any additional items I put in, I record and check in just as if I bought the items beforehand.
At this point, entry is not too efficient since I'm not sure what's important to track and what's not. I'm recording everything I can, even alternate suppliers and possible substitutions if I see the item available elsewhere. The database is relational so it's very easy to add/drop features to it. I'll have more news on that later.
Establishing the database was made easier by modifying a template from MS-Access. Time to modify the database, I would estimate would be about 8 hours to get it right for my use. Fortunately, I'm not in too much of a hurry so I don't mind spending some time thinking about my needs, then modifying a database to record them.
Saturday, July 5, 2008
Unpack and paint some parts
Finally! Time to start! The first task is to paint the chassis and rust proof it so the vehicle doesn't rust away during the winter time when salt is applied to the roads. Unfortunately, the garage flooding was rather hard on the EV to be. A mild coat of rust was forming outside (and probably inside too) so I felt that simply coating the frame with paint as per the assembly manual was not an option. Doing so would just seal the rust in. So, I decided that a zinc based compound should be applied in the hopes that the zinc would rust before the steel does. The compound of choice was a product made by LPS (1-800-241-8334). It's an aerosol can product called "cold galvanize corrosion inhibitor" that claims a zinc purity of 99%. Using this coating is an experiment. However, I'm willing to try most anything to prevent roadway salt from eating my bug!

 So, to paint, the first step was to unpack the bug components. The upper supports on the shipping crate were quickly sawed off with a portable reciprocating saw and lifted off. Then, the fiberglass body was lifted off. The shell isn't too heavy but I feel it's beyond one person to lift it off safely. Fortunately, with two people, it's easy and only takes about 5 minutes. After that, the other parts were unpacked and rear fiberglass housing and battery tray were then taken off. The last component to be taken off the pallet was a two-piece steel frame which was attached to the pallet with two giant wood bolts. Once all the parts are separate, they can all be moved by one person.
 The two piece steel frame was detached from the pallet, then taken apart. This was not easy. I found that the large bolt holding the two main frame pieces together needed to be hammered out with a railroad spike. Then, a 1/4" drill bit was used to drill holes in various places under each frame piece so zinc spray could be applied via a straw. To do so, the aerosol nozzle of the zinc compound was replaced with a different spray nozzle that can accept a small plastic straw. Note, a WD-40 nozzle spray top has the wrong spray can "gender". Fortunately, I had a key lock lubricant which had the correct gender and straw. Painting was done in a low cost kiddie pool to catch drips from the zinc compound. After the paint straw was removed, 1/4" rubber grommets were applied at each access hole. Hopefully, each access hole will allow water to drain so rust doesn't form as quickly from the inside as it would without treatment.
 Since there is quite a bit of visible but mild rust on the outside of the frame, a chemical approach was used to remove it. The chemical of choice was naval jelly, available in most auto stores. It dissolves rust but not the rust-free steel. As the rust is dissolved, it can be scrubbed with a wire brush and then the compound is washed away with tap water leaving bare metal. The parts look great after doing this but they are very vulnerable to corrosion so they must be coated immediately after washing off. The parts also had oil left on them from drilling holes for anti-corrosion steps so the parts needed to be washed further. The parts were set in the kiddie pool located in the driveway and lacquer was applied by brush. Some internal galvanizing compound broke down when exposed to the lacquer so the parts didn't look too clean. However, the parts were clean enough to accept the galvanizing compound. Disposal of the lacquer was not a problem. It was a hot sunny day so the used lacquer just evaporated on it's own.
 Next, I put the frame parts back on the pallet, put on the respirator and started spray painting. Since I ran out of galvanizing compound, I finished the job with Rustolium's corrosion inhibitor product. I found the Rustolium product didn't cover as well and tended to run more. Also, I've decided to use a different color primer rather than gray so I can tell I've entirely covered the gray anti-corrosion layer. I've also decided to go with a shiny finish on the frame instead of the matte black color since I suspect it will repel roadway grime better. The matte black spray paint I already bought will now be used for the console area instead.
 For painting, I was originally going to use spray primer then coat with spray paint after. However, after reading the labels on the cans I had a problem with that approach. Turns out, many primers don't bind to galvanized metal! I didn't want to take the chance the galvanized paint would act like galvanized metal (in terms of paint retention) so I looked for other alternatives. Fortunately, Rustolium made a black enamel paint for appliances that didn't have the galvanized metal warning. As a bonus, it even recommended that the paint be applied direct with NO primer! The finish looks OK. Hope it is as durable as it seems!
There is something more I should mention about painting for any would be bugE builders. Since my neighborhood has a homeowner association, they have rules on keeping the neighborhood tidy. So, with the assistance of a home made dolly, I just wheel the whole pallet out of the garage to paint, then wheel it back in to dry!
Step Summary:
1) Take off cardboard. Check in parts against packing list. 1/2 hour
2) Detach bug parts from crate & set asside parts that don't need to be painted. Then take apart frame for painting. Document (or take photo of) tie rod ends & rear shock - 1 hour
3) Drill 1/4" holes, apply anti-rust compound squirting compound inside holes, swishing around compound inside frame, then apply grommets - 3 hours (and overnight to dry)
4)Apply naval jelly to remove rust from exterior. Then rinse to remove 1 hour.
5) reapply naval jelly again, grind & scrub if rust is severe 1 hour.
6) Set in kiddie pool and apply lacquer thinner to all exterior surfaces to prep metal for treatment 1 hour
7) Apply zinc corrosion inhibitor to top side 45 mins (then wait > 3 hours to flip)
8) Apply zinc corrosion inhibitor to bottom side 45 mins (then wait 8 hours)
9) Apply black enamel spray paint to exterior on top. 45 mins (then wait 8 hours to flip)
10) Apply black enamel spray paint to exterior on bottom. 45 mins (then 8 hours dry time)
13) Reassemble bug frame & parts according to images taken before disassembly & put on sawhorses. (haven't done yet)
14) Blog about it - Est. about 8 hours at various points during the week.
Tools used so far...
Reciprocating saw
Socket set (for detaching frame from pallet)
Screw gun (for detaching bug from pallet)
Drill (and 1/4" bit)
Respirator, safety glasses, earplugs
Screwdriver, hammer, railroad spike
sawhorses, kiddie pool
paint brush and a throwaway container for jelly and thinner, coat hangers & rags.
Shipping pallet & home made dolly
Purchases - HOME DEPOT - Tax not included:
1 - box Nitrinol Gloves 2.99
2- Rustolium 12oz primer spray paint 3.97 ea. - 7.94
2- Rustolium 12oz matte black spray paint 3.97ea - 7.94
1- pt. Lacquer thinner 6.69
2-sets respirator filters 15.49ea - 30.98
Purchase - Toys-R-Us - tax not included
1 - kiddie pool - 7.99
Purchase - Radio Shack - tax not included
2- Vinyl Grommt Kit assortment (Part 64-3025) - 1.99ea - 3.98
Purchase - Home Depot - tax not included
1 -Rustolium Corrosion inhibitor
3- Rustolium 12oz black gloss enamel spray paint 3.97 ea. - 11.91
ACE Hardware (Suburban Hardware) - tax not included
2-LPS galvanize spray 12.49ea - 24.98
1-Naval Jelly 3.99
AutoAnything.com (free shipping)
2- CIPA Lighted Euro Sport Side View Mirrors - 49.95
So, to paint, the first step was to unpack the bug components. The upper supports on the shipping crate were quickly sawed off with a portable reciprocating saw and lifted off. Then, the fiberglass body was lifted off. The shell isn't too heavy but I feel it's beyond one person to lift it off safely. Fortunately, with two people, it's easy and only takes about 5 minutes. After that, the other parts were unpacked and rear fiberglass housing and battery tray were then taken off. The last component to be taken off the pallet was a two-piece steel frame which was attached to the pallet with two giant wood bolts. Once all the parts are separate, they can all be moved by one person.The two piece steel frame was detached from the pallet, then taken apart. This was not easy. I found that the large bolt holding the two main frame pieces together needed to be hammered out with a railroad spike. Then, a 1/4" drill bit was used to drill holes in various places under each frame piece so zinc spray could be applied via a straw. To do so, the aerosol nozzle of the zinc compound was replaced with a different spray nozzle that can accept a small plastic straw. Note, a WD-40 nozzle spray top has the wrong spray can "gender". Fortunately, I had a key lock lubricant which had the correct gender and straw. Painting was done in a low cost kiddie pool to catch drips from the zinc compound. After the paint straw was removed, 1/4" rubber grommets were applied at each access hole. Hopefully, each access hole will allow water to drain so rust doesn't form as quickly from the inside as it would without treatment.Since there is quite a bit of visible but mild rust on the outside of the frame, a chemical approach was used to remove it. The chemical of choice was naval jelly, available in most auto stores. It dissolves rust but not the rust-free steel. As the rust is dissolved, it can be scrubbed with a wire brush and then the compound is washed away with tap water leaving bare metal. The parts look great after doing this but they are very vulnerable to corrosion so they must be coated immediately after washing off. The parts also had oil left on them from drilling holes for anti-corrosion steps so the parts needed to be washed further. The parts were set in the kiddie pool located in the driveway and lacquer was applied by brush. Some internal galvanizing compound broke down when exposed to the lacquer so the parts didn't look too clean. However, the parts were clean enough to accept the galvanizing compound. Disposal of the lacquer was not a problem. It was a hot sunny day so the used lacquer just evaporated on it's own. Next, I put the frame parts back on the pallet, put on the respirator and started spray painting. Since I ran out of galvanizing compound, I finished the job with Rustolium's corrosion inhibitor product. I found the Rustolium product didn't cover as well and tended to run more. Also, I've decided to use a different color primer rather than gray so I can tell I've entirely covered the gray anti-corrosion layer. I've also decided to go with a shiny finish on the frame instead of the matte black color since I suspect it will repel roadway grime better. The matte black spray paint I already bought will now be used for the console area instead.
 For painting, I was originally going to use spray primer then coat with spray paint after. However, after reading the labels on the cans I had a problem with that approach. Turns out, many primers don't bind to galvanized metal! I didn't want to take the chance the galvanized paint would act like galvanized metal (in terms of paint retention) so I looked for other alternatives. Fortunately, Rustolium made a black enamel paint for appliances that didn't have the galvanized metal warning. As a bonus, it even recommended that the paint be applied direct with NO primer! The finish looks OK. Hope it is as durable as it seems!
There is something more I should mention about painting for any would be bugE builders. Since my neighborhood has a homeowner association, they have rules on keeping the neighborhood tidy. So, with the assistance of a home made dolly, I just wheel the whole pallet out of the garage to paint, then wheel it back in to dry!
Step Summary:
1) Take off cardboard. Check in parts against packing list. 1/2 hour
2) Detach bug parts from crate & set asside parts that don't need to be painted. Then take apart frame for painting. Document (or take photo of) tie rod ends & rear shock - 1 hour
3) Drill 1/4" holes, apply anti-rust compound squirting compound inside holes, swishing around compound inside frame, then apply grommets - 3 hours (and overnight to dry)
4)Apply naval jelly to remove rust from exterior. Then rinse to remove 1 hour.
5) reapply naval jelly again, grind & scrub if rust is severe 1 hour.
6) Set in kiddie pool and apply lacquer thinner to all exterior surfaces to prep metal for treatment 1 hour
7) Apply zinc corrosion inhibitor to top side 45 mins (then wait > 3 hours to flip)
8) Apply zinc corrosion inhibitor to bottom side 45 mins (then wait 8 hours)
9) Apply black enamel spray paint to exterior on top. 45 mins (then wait 8 hours to flip)
10) Apply black enamel spray paint to exterior on bottom. 45 mins (then 8 hours dry time)
13) Reassemble bug frame & parts according to images taken before disassembly & put on sawhorses. (haven't done yet)
14) Blog about it - Est. about 8 hours at various points during the week.
Tools used so far...
Reciprocating saw
Socket set (for detaching frame from pallet)
Screw gun (for detaching bug from pallet)
Drill (and 1/4" bit)
Respirator, safety glasses, earplugs
Screwdriver, hammer, railroad spike
sawhorses, kiddie pool
paint brush and a throwaway container for jelly and thinner, coat hangers & rags.
Shipping pallet & home made dolly
Purchases - HOME DEPOT - Tax not included:
1 - box Nitrinol Gloves 2.99
2- Rustolium 12oz primer spray paint 3.97 ea. - 7.94
2- Rustolium 12oz matte black spray paint 3.97ea - 7.94
1- pt. Lacquer thinner 6.69
2-sets respirator filters 15.49ea - 30.98
Purchase - Toys-R-Us - tax not included
1 - kiddie pool - 7.99
Purchase - Radio Shack - tax not included
2- Vinyl Grommt Kit assortment (Part 64-3025) - 1.99ea - 3.98
Purchase - Home Depot - tax not included
1 -Rustolium Corrosion inhibitor
3- Rustolium 12oz black gloss enamel spray paint 3.97 ea. - 11.91
ACE Hardware (Suburban Hardware) - tax not included
2-LPS galvanize spray 12.49ea - 24.98
1-Naval Jelly 3.99
AutoAnything.com (free shipping)
2- CIPA Lighted Euro Sport Side View Mirrors - 49.95
Subscribe to:
Posts (Atom)


